Tuesday, January 31, 2006

ARF/5-a-day Tuesday #5 - Tomato thokku (chutney)

Sweetnicks: ARF/5-A-Day Tuesday #5#links

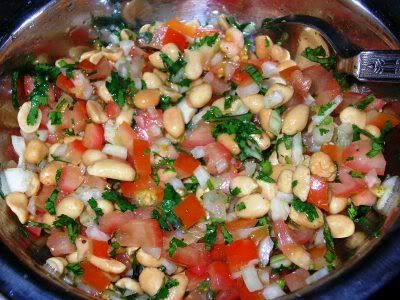
A pretty simple entry for this week's ARF/5-a-day event. Since Pete insisted on cooking dinner for us, I dont have any photographs of the yummy mixed vegetable stir fry he made. He's the sort of person who doesnt want anybody in the kitchen while he's cooking up his magic. This arrangement always works out fine for both of us, and this time I watched Malcolm in the Middle in happy contentment.

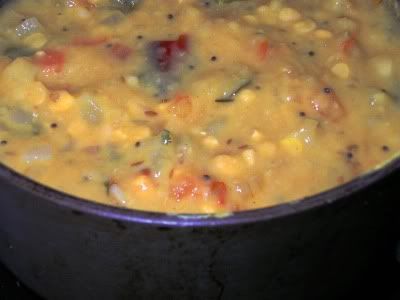
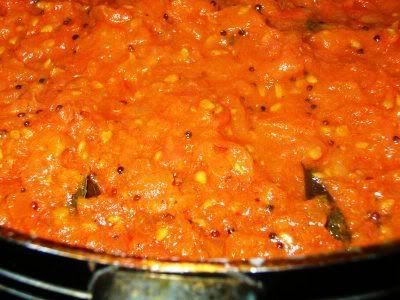
But to show willing for ARF/5-a-day, and because I had a surfeit of tomatoes, I made a savoury chutney (thokku, in Tamil). This is dead easy to make and keeps for a week, refrigerated. It's a versatile item, this thokku. I use it as a spread for savoury sandwiches, as a side-dish with idlis or dosas or even chapatis, as a spicy accompaniment for curd rice, and as the base for making tomato rice. (I even use it as a dip for breadsticks, but that's probably just me.)


The taste of this thokku can be varied by adding different spices or herbs... green chillies, red chilli powder, a handful of coriander leaves, garlic, cumin seeds, coriander powder, even 1/2 tsp of toasted powdered fenugreek seeds - all these make for appreciable changes in taste. I wouldnt really advocate using them all at the same time, though.

The texture of this thokku can also be a matter of personal taste. You can blitz the tomatoes (before cooking) in a blender for a smooth puree, or chop them up finely and cook them for a more chunky texture.


Since I had nothing to do but watch TV, I opted to chop the tomatoes this time - besides, I like my thokku chunky.

Recipe for:
Tomato thokku (chutney)


Ingredients:

8-10 ripe medium tomatoes, chopped or pureed
2 tsp mustard seeds
2 tsp red chilli powder (or to taste)
1/2 tsp asafoetida powder
1/4 tsp fenugreek seeds, powdered (optional)
1/2 tsp turmeric powder
1 tsp coriander seeds, powdered
5-6 curry leaves
Salt to taste
2 tbsp oil

Method:

1. Heat the oil in a wide pan. Add the mustard seeds, cover, and let them pop - then put in the various powders, curry leaves and fry for 15-20 seconds on high.

2. Lower the heat and add the chopped/pureed tomatoes. Stir well to mix.

3. Bring the heat up to medium-high and cover the pan. Let the tomatoes cook in their own juices till they soften and break down.

4. Once the tomatoes are soft, take the lid off and let it cook, stirring occasionally, till the liquid evaporates and the sauce reduces to a thick paste.

5. Let the thokku cool, then store in a clean airtight jar in the refrigerator.

Sunday, January 29, 2006

Sweet potatoes - double disaster

Well, it's official - I'm going to stay well away from sweet potatoes from now. I cant say as I liked them excessively at any point, but I'm pretty sure that I wont be cooking THAT particular vegetable at home in a hurry.

First I thought I'd try making sweet potato crisps in the oven. Bad idea. The slices went soggy and soft, never quite making the transition to a crisp texture - and those few slices which escaped that fate merely went on to suffer another, ending up pretty much inedibly browned. *sigh* I guess I was lulled into a slight complacence by the success of the previous oven-crisp efforts with cassava and yam.

Anyway, I still had about 4 medium sweet potatoes left after the crisp disaster. So I decided to make halwa with them. I decided not to bother with looking up any recipe for sweet potato halwa - bad call, once again. I grated them, put them into a large quantity of milk and boiled the whole thing with 1/2 cup sugar till it reduced down to a pale orange mush. It was NOT appetising to look at ("pre-digested" comes to mind; so does "regurgitated"), so I tried to rescue the sad excuse for halwa by adding some condensed milk. Still no good.


Then I tried garnishing it with toasted flaked almonds and golden sultanas. Worse effect still, whether to look at or to eat (I tried a somewhat squeamish spoonful, so I know.)

The texture of the cooked grated sweet potatoes was soft and squidgy - like baby food, perhaps, and over-sweet (maybe the condensed milk was a bad idea). It was probably my own damn fault for cooking the sweet potatoes for so long - and it probably took that long to reduce down because there was probably way too much milk in the first place... in any case, I'm afraid my halwa experiment ended in the bin. Nothing to salvage there.

Oh well, nobody ever said that every cooking attempt would turn out perfect.

I'm in two minds whether or not to post pictures of my disastrous attempts with sweet potatoes... should I, shouldnt I? Jury's still out.

Thursday, January 26, 2006

Okra with onions (Bhindi bhaji)

I like okra (bhindi in Hindi, vendakkai in Tamil), as long as the end result of cooking them isnt reminiscent of the nasal debris from someone with a very bad cold. There are various little tricks by which the sliminess of okra can be avoided (Indira, of Mahanandi fame has some tips), but I follow two simple rules which always work for me:

1. ALWAYS wash okra and dry thoroughly before cutting.

2. Dont cover the pan completely while cooking okra - in short, dont steam-cook it.

(Another - and completely foolproof - method to avoid sliminess is to deep-fry the okra. Tastes great but obviously it isnt the healthiest option!)

I also find that the smaller the pieces of okra, the gluey-er (gluier? glueyer? how IS this word spelt?) they get, so I normally cut them into inch-long pieces. I dont add lime juice or curds/yogurt to the okra during the process of cooking, either... I just ensure that the heat is medium-high and that the pan isnt completely covered.


An odd thing about okra, when it's half-cooked, it goes a brighter green than it was before the cooking process! It's done when it goes slightly limp and dark green.

Okra cooked this way, with plenty of browned onions, is delicious with chapaties or rice. I served it this time with
lemon rice - Pete's favourite combination.

Recipe for:
Okra with onions (Bhindi bhaji)


Ingredients:

3 cups okra, washed, dried and cut into inch-long pieces
2 medium onions, sliced thin
1 tbsp sesame seeds
1 tsp mustard seeds
1 tsp coriander powder
1/2 tsp cumin powder
1 tsp red chilli powder (or to taste)
1/2 tsp minced garlic
1 tbsp oil
Salt to taste
1 tbsp coriander leaves, chopped, for garnish
1/2 tsp chaat masala, for garnish (optional)

Method:

1. Heat the oil in a wide, shallow pan and add the spice powders, minced garlic, sesame seeds and mustard seeds. Cover and let the mustard seeds pop (about 30 seconds).

2. Now add the sliced onions and let cook till it begins to turn brown.

3. Add the okra and stir well. Let the heat remain on medium-high. Partly cover the pan with the lid.

4. Let the okra cook for 5 minutes, then stir it about with a spatula.


5. Take the lid off and fry the okra, stirring it occasionally, until the pieces shrivel a little and turn dark green. If you are unsure if the okra is cooked, bite (carefully!) into a piece - if it's still crunchy and tastes a bit raw, let it cook a little longer.

6. Serve hot, sprinkled with coriander leaves and the chaat masala, if desired.

Wednesday, January 25, 2006

It's so nice to be included!

Here: Sweetnicks: ARF/5-A-Day Tuesdays #4#links

Orange-scented blueberry pancakes

I've been wanting to make American-style pancakes for a while now, because Pete's never had them. Do I hear gasps of horror? I admit I was quite surprised myself when I discovered that fact, but apparently he's only ever had crepes. Which are nice, but I like the chunky American-style ones too, and I wanted to make a convert of him.

Blueberries were the fruit of the day, as far as I was concerned - so blueberry pancakes were on the breakfast menu for the day.

I like a gentle flavour of orange (lemon, too) with the blueberries, so I added 3-4 tbsp of orange juice and a generous tsp of grated orange and lemon peel to the batter. It worked beautifully, especially with a drizzle of maple syrup over the top. And yes, I have a convert.

Recipe for:
Orange-scented blueberry pancakes


Ingredients:

1 cup flour
1/2 tsp grated nutmeg
1/2 tsp cinnamon powder
1 tsp baking powder
3-4 tbsp sugar (I used Splenda)
3 tbsp orange juice
1 htsp grated orange and/or lemon peel
1/2 cup milk
1/2 cup yogurt (I used mixed berry-flavour yogurt, but plain is fine too)
2 tbsp melted butter (or vegetable oil, which is what I used)
1 large egg
1 cup blueberries

Method:

1. Mix the flour, spices, baking powder and sugar together. Set aside.

2. In a medium bowl, mix the milk, orange juice, yogurt, butter/oil, grated peel and egg together, until the egg is well incorporated.

3. Add the flour mix to the wet mix, about 2 tbsp at a time, stirring with a large form all the time so that there are no lumps. The batter will be quite thick - it should drip only very slowly off a ladle.

4. Stir in the blueberries.

5. Heat a non-stick, shallow pan on medium heat. Pour a ladleful of the batter in and cook it on medium-low, till holes form on the surface.


6. Turn the pancake over and let the other side cook to a pale golden colour. Keep the cooked pancakes warm in the oven while making the rest.

7. Serve hot or warm with a generous drizzle of maple syrup.

Note: The batter has to be thick. If it is too thin, it will not coat the blueberries, which will burst open quietly when the pancake is cooking, leaking the juices and making a mess of the pancake (and the pan). This is the voice of experience talking.

Tuesday, January 24, 2006

ARF/5-a-day-Tuesday #4 - Broccoli, carrot and potato masala

Wow, it's already that time of the week again - time does fly! It's a good thing that I dont take part in each and every foodblog event that comes along, because posting in this blog would pretty much have to be my full-time career! Which would be rewarding enough in its own way - except its way would not be MY way, which is the path of having to earn a living.

Would that I had the writing talent and cooking genius of the famous Clotilde (of
Chocolate & Zucchini fame)... how different my life would be...

However, being realistic about my abilities (cooking or writing) is one of my best talents, so I'll have to make do with muddling along in the culinary field as best as I can. Hence broccoli, carrot and potato masala.


Not the most exciting of combinations, not the most delicate of preparations and definitely not the most complicated... but tasty. It did me and Pete well for a weekday dinner, healthy and vegetable-y, served over cous-cous. We could all do worse.

Recipe for:
Broccoli, carrot and potato masala


Ingredients:

One medium head broccoli, separated into small florets
2 small carrots, sliced into rounds
1 large potato, diced into small cubes
2 large cloves garlic, minced
1 tsp coriander powder
1 tsp cumin seeds
1 tsp sesame seeds
1 tsp garam masala (optional)
2 tbsp olive oil
3-4 green chillies (or to taste), minced
OR
1 tsp red chilli powder
Water as required
Salt to taste

Method:

1. Fill a large bowl with boiling water and blanch the broccoli florets in it for 3-4 minutes, covered. Then drain and refresh the florets with cold water. Set aside.

2. Heat 1 tbsp olive oil in a pan and saute the garlic, chillies and all the spices for 30 seconds, then add the diced potato.

3. Stir well and cook it on a medium flame until it's partly cooked.


4. Add the carrots along with the remaining tbsp oil and one cupful of water, cover and simmer till the carrots and potatoes are nearly cooked.


5. Last of all, add the broccoli with a half-cup of water and salt to taste. Mix it well with the potatoes and carrots. Let it cook for 3-4 minutes on high, stirring occasionally. When the broccoli is done to your liking (I dont like mine mushy so I dont overcook it), turn the heat off. The curry should be slightly soupy, not completely dry.

Serve hot as a side dish with chapatis, over pasta or with cous-cous.

Monday, January 23, 2006

Oven-baked yam crisps

I had a yam. I had it for 3 weeks, actually. Often - sometimes even twice a day - I would take it out of the vegetable basket, look at it, wonder what to do with it, and then put it back, just as undecided as before.


On one of those inspections, on a daring impulse, I decided to wash the grit off it. I dried it thereafter, patted it to let it know that it was not being ignored - and put it back out of sight. Back to Square One.

I looked my yam up on the Web (well, not MY yam in particular, but the family history of yams in general), and discovered that what most Americans refer to as "yam" is actually a variety of sweet potato with bright orange flesh. Yam, apparently, is not as commonly available in supermarkets in the US as most people might imagine - they are more likely to be found in ethnic food stores.

This was interesting information, but it didnt get me any closer to using my yam.
Then yesterday, in a do-or-die spirit of Enterprising Culinariness, I retrieved my long-suffering yam from its temporary-but-nearly-became-permanent home, determined to do something edible with it.

To that end, I peeled the darn thing... and got an unpleasant surprise because the texture of the yam was disgustingly slimy. And I mean REALLY slimy. Think chopped okra washed in warm water - yes, THAT slimy. (Maybe I shouldnt have peeled it? I dunno!) I very nearly let the whole lot slither into the bin, but that would have gone against the Code of Enterprising Culinariness that is so important to all just-above-mediocre cooks like me (Remember, people - this is where you heard of the Code first!).

So I persevered, cutting the yam into round slices about 1/4 cm thick - or as close to that as I could manage with my knife. The yam slices were quite pretty because they had a delicate design of self-coloured dots - they kind of looked like small grains of semi-transparent, half-cooked sago (jevvarisi in Tamil) put together. (Ok, this might sound like a desperate attempt to retrieve the reputation of my yam - but honestly, the slices were pretty!)


I didnt feel in the least like boiling the slices or cooking them in any other way, so I decided to make crisps of them in the oven. I have to say that I was not at all sure of the outcome... but the Code spurred me on to lay out the slices neatly on a baking tray which I had covered with a sheet of silicone paper sprayed with Light Sunflower Oil (I was certain the yam would overcome the non-stick aspect of the solicone paper, which is why the extra precaution of spraying it!). Then I sprayed the slices with more of the same, and shoved the tray into the oven at 180C.

About 15 minutes later, I mustered up the courage to peek in - and what a surprise, the yam slices had dried out nicely and were in the process of crisping up. Filled with the glee of a cooking experiment that had, unaccountably and against all odds, worked out just fine, I turned over each slice and put the tray back in the oven.

Another 10 minutes (this time with a close eye kept on the crisps lest they turned into yam charcoal), and I had a trayful of wonderfully firm-textured, extremely tasty yam crisps. Salted and peppered, they served to satisfy our mid-afternoon munchies admirably well. May the soul of my yam find its satisfaction from ours.

Long live the Code!

Recipe for:
Oven-baked yam crisps


Ingredients:

1 yam, peeled and sliced uniformly into 1/4-cm thick slices
Cooking spray as required
Salt and pepper or other spices to taste

Method:

1. Preheat the oven to 180C (about 350F) Arrange the yam slices on a baking sheet covered with greased silicone paper, so that the slices arent touching.

2. Bake for 15 minutes or so, or until the top surface of the yam has dried out and the slices are becoming brown.

3. Turn over the slices and bake for another 10 minutes, until the slices are crisp and brown (if you dont want the crisps very brown, take them out after five minutes - they will be chewy-crisp).

4. When cool, season with salt and pepper (or spices to taste) and store in an airtight container.

Tuesday, January 17, 2006

Tagged - the 7 Meme

I do believe I've been tagged - by the ebullient, funny, evocative food blogger Anthony, of Anthony's Bachelor Cooking. I dont get tagged nearly enough (and let's face it, some of those memes are simply too complicated for the likes of me!), so it's always exciting when one comes along. Here goes then, without further ado:

The 7 Meme

7 Things to Do Before I Die:
1. Sky-dive in New Zealand
2. Grow a tree (preferably a cherry tree, so it can blossom in the spring)
3. Learn to read/write/speak Japanese
4. Visit Japan (duh)
5. Meet Chris Evans (of Cellular fame)
6. Live in a real English castle
7. Become a millionaire, quit my job and travel travel travel


7 Things I Cannot Do (or things I do NOT enjoy doing)
1. Dive without displacing half the water in the pool
2. Watch sci-fi flicks that feature gooey, slimy, dripping ugly creatures (this also includes William Shatner)
3. Go to noisy nightclubs
4. Put up with hypocrites
5. Smoke cigarettes
6. Not be jealous of anybody with straight shiny thick black hair (this probably rules out most of China)
7. Maths - ANY kind

7 Things that Attracted Me to Blogging
1. Being able to write what I want, how much ever I want without being censored or edited
2. Having other bloggers visit, read and leave comments in my blog(s) (thanks for this one, Anthony!)
3. Reading other blogs - especially the funny and inspiring ones
4. Making new friends, meeting fellow bloggers
5. Food blogs
6. Food blogs
7. Food blogs

7 Things I Say Most Often
1. Damn, I dont want to go to work.
2. Good morning, how may I help you today (when at work)
3. NOW where's the remote gone?
4. Good grief (I'm a Charlie Brown fan, can you tell?)
5. Nice (differing tones depending on the situation)
6. And this is going to help how?
7. Wha?

7 Books I Love
Damn, it's gonna be difficult to whittle down my list to just 7... gotta cheat a bit
1. To Kill a Mockingbird
2. Malgudi Days
3. Daddy Long Legs
4. Roots
5. (cheat begins here) All Terry Pratchetts
6. Most of Stephen King
7. All of P G Wodehouse (cheat ends)

7 Movies I Watch Over and Over
1. Sholay (Hindi)
2. Nayakan (Tamil)
3. All of Me (*ing Steve Martin)
4. Dirty Rotten Scoundrels (*ing Steve Martin again)
5. Mrs Doubtfire
6. The Jungle Book
7. The Sound of Music

7 Bloggers I’m Tagging
This is going to be difficult because I suspect this meme has been doing the rounds for a looooooong time, but I'll give it a go:
1. Sailu, of
Sailu's Food
2. Lera, of
Myriad Tastes
3. Priya, of
Priya's Kitchen
4. Bilbo, of
Smorgasbord
5, 6, 7. Anybody who reads this and wants to :)

ARF/5-A-Day #3 - Poricha kuzhambu (South Indian mixed vegetable 'stew')

I like this particular cooking event hosted by Sweetnicks, and I'm pleased that I havent missed too many episodes - just the first one entirely. I took part in the second ARF/5-a-day event, but was too late sending my link to Sweetnicks (mainly from sheer ignorance).

The other events hosted by food bloggers are usually out of bounds for me for various reasons - not enough time/inclination/imagination/expertise/take your pick - but since I've been trying to eat more veg and generally be more healthy, this event appeals to me a lot. It isnt difficult either - I mean, vegetables and fruit are everyday items on the menu, so putting up a post is easily accommodated. As an added bonus, I get to feel like I belong with the other food bloggers. It's all good! Yay for Sweetnicks! :)

Anyway, my entry for ARF/5-a-day #3 is poricha kuzhambu - a favourite with all of us when we were growing up and especially so for my mother, because she could use up all the odds and ends of vegetables left at the end of the week. It's my brother's all-tmie favourite, I think - paired with coconut thogayal (a type of chutney) and sutta appalam (poppadums which have been cooked directly on an open flame instead of being deep fried). I like an added extra with that - narthangai, which is a type of green citron (my best guess, since I dont have the English word for this fruit), salted and sun-dried.

My reason for making poricha kuzhambu was pretty much because I had lots of bits of vegetables - carrots, cabbage, green beans, spinach, potatoes, chayote squash. And I added some frozen green peas as well, because I love peas. It's an incredibly healthy recipe, containing all these veggies as well as protein in the form of
moong dal. It's also very simple if you use a pressure cooker.


Moong dal

Recipe for:
Poricha kuzhambu (South Indian vegetable 'stew')


Poricha kuzhambu, served over rice with coconut thogayal and fried bitter-melon crisps (brought over from India!)

Ingredients:

4 cups mixed vegetables, chopped (any combination of carrots, green beans, cabbage, spinach, potatoes, chayote squash, aubergine, peas, etc, but not okra)
1/2 cup moong dal
1/2 tsp turmeric powder

Grind together to a smooth paste, using a few tbsp warm water:
2-3 tbsp grated coconut
1 tsp black peppercorns
3-4 dry red chillies (or to taste)
1 tsp cumin seeds
2 tsp rice flour

For tempering:
1 tsp oil
2 tsp whole cumin seeds
2 tsp mustard seeds
7-8 curry leaves
2 tsp urad dal
pinch of asafoetida powder

Method:

1. Pressure cook the dal and vegetables together with turmeric powder for about 3 whistles. When the cooker can be opened safely, stir the vegetables and dal till mixed.

If not using a pressure cooker, cook the dal separately in plenty of water till soft and mushy. Drain most of the water and mash the dal. Cook the vegetables separately in just enough water to cover, till they are somewhat overdone but not a helpless mush. Mix the two together, add salt to taste, and set aside.

2. In a deep pan, heat the oil. Put in the mustard seeds, cover, and let them pop. Add the rest of the tempering ingredients and stir till the urad dal turns reddish.

3. Now pour in the vegetable-dal mixture. Stir in the coconut masala paste until it is well amalgamated with the vegetables.


4. Add more water if the mix is too thick, and stir. Bring to a boil, then reduce the heat and let it simmer gently for five minutes.

5. Serve hot over steamed rice, or with chapaties.

Monday, January 16, 2006

Easy peanut salad

The last time Pete and I were in Bangalore (2003), after a bit of bar-hopping with friends, we broke from the main party to walk around by ourselves. I must have been quite mellow by then because I remember putting up only the mildest objection when Pete decided he wanted to check in on a nightclub - out of professional interest, he said, a Brit DJ's curiosity about what music was played by Indian DJs.

I cant remember the name of the nightclub but it was on the first floor, a bit seedy, with lurid UV lighting that gave a ghoulish glow to teeth and the whites of the eyes. The music was ok, but what distinguished the place as far as we were concerned was the superb peanut salad that came free with the drinks. It was the absolute best I've ever had anywhere and as far as I could tell (remember my mellowness, which luckily didnt affect my taste buds), the ingredients were bog standard.

I made my version of this salad yesterday when some friends came home, and although (as always) the salad didnt, in my opinion, reach the standard of the nightclub one, everybody said it was the perfect accompaniment for beer and alcohol in general. Well hey, deserving or not, you gotta take the kudos as you find it, so I sat back and sipped my margarita, glowing in the manner of the amateur cook who has just had a lot of praise for a very simple preparation. It works for me!


Recipe for:
Easy peanut salad


2 cups lightly salted peanuts (ready-bought ones will do fine)
2-3 green chillies, minced fine (optional or to taste)
2 medium tomatoes, de-seeded and chopped
1 medium onion, chopped fine
Juice of one lemon/lime (to taste)
1/2 tsp freshly ground peppercorns (to taste)
1/2 cup fresh coriander leaves, chopped
1/2 tsp chaat masala for garnish (optional)

Method:

1. Mix all the ingredients together, sprinkle the chaat masala on top if using, and serve at room temperature as a snack to go with drinks.

Thursday, January 12, 2006

Mor kuzhambu (savoury buttermilk gravy/sauce for rice)

In India, the humidity and heat have a way of making fresh curds/yogurt SO sour that it practically "speaks" - tilt the container even a little and evil little burping, bubbling noises happen on the surface. It's a heck of a struggle to keep the yogurt sweet and fresh. Refrigerating the curds helps, but it is not prevention, merely a postponement of the inevitable sourness. And when the inevitable happens, it is time to make mor kuzhambu with the curds.

Here in the UK, the problem is reversed... the yogurt/curds simply does not get sour - assuming, that is, that I've been able to get it to set in the first place. The buttermilk you get in the supermarket is not buttermilk as I knew it in India - it looks and tastes very much like plain set yogurt thinned down with a little water to make it of pouring consistency. Of sourness there is not even a hint.

So when I get the urge to make mor kuzhambu here, I have to use artificial means (1/4 tsp of tamarind paste, to be precise) to make the curds taste sour. Is anybody wondering WHY I bother, when I'm a self-confessed hater of sour curds? Well, the answer is that the sourness is necessary to make this recipe... because when it is tempered with the simply spiced coconut "masala", the sour curds/buttermilk is transformed into a thing of - well, perhaps not beauty, but definitely tastiness.


It's comfort food for South Indians like me, that's for sure. Team it with pan-roasted potatoes,
vazhakkai (plantain) curry
or cabbage/beans paruppu usili and you get the maximum comfort and pleasure from this simplest of preparations. At least I do.

Recipe for:
Mor kuzhambu


Ingredients:

4 cups sour buttermilk (or 2 cups plain Greek yogurt mixed with 3 cups water and 1/4 tsp tamarind paste to make a fairly thick buttermilk)
2 tbsp fresh grated coconut
5-6 green chillies (add as per taste)
1/2 tsp cumin seeds
1 tbsp rice flour
Salt to taste

For tempering:
2 tsp mustard seeds
4-5 curry leaves
pinch of asafoetida powder
2-3 dry red chillies (optional)
1 tsp oil
1 tsp chopped coriander leaves, for garnish

Method:

1. Grind the coconut along with the cumin seeds, green chillies and rice flour to a smooth paste, using a few tbsp of warm water.

2. Stir this paste, along with salt to taste, in the buttermilk until well mixed. Set aside.

3. In a pan, heat the oil, add the asafoetida, the mustard seeds and curry leaves (also the red chillies, if using), cover and let the seeds pop for 30 seconds or so.

4. Pour the buttermilk-coconut mixture into the pan and stir well. Bring to a simmer, stirring frequently, until the mor kuzhambu is heated through.

Tip: Be careful not to bring it to a boil or leave it on the stove for long, because the curd will very likely separate and make the whole thing look disgusting - although the taste will not be affected.

Wednesday, January 11, 2006

Alu tikkis (potato patties)

Sometimes you just get a craving for something you KNOW is unhealthy - spicy deep-fried snacks, for instance, or the fast-food that is so plentifully available in India... samosas, veg cutlets, bajji, pav bhaji, cashewnut-onion pakoda and so on. Unfortunately (or fortunately, perhaps) none of those things are easy for me to obtain where I live, so eventually the cravings die an unnatural death by unfulfilment. Just sometimes, though, a compromise is reached between cravings and healthy eating - and alu tikkis (potato patties) baked in the oven is one such compromise.

I baked most of them in the oven, and shallow-fried a few in a wide pan using as little oil as possible, in a spirit of scientific curiosity. I just wanted to find out just how much difference there would be in taste and texture... and argh, the shallow-fried ones were - naturally - much tastier and better in texture as well. But oh well, there are some sacrifices that have to be made in the interests of low-fat cooking.

Note that I said the oil-fried ones were "tastier" - meaning that the oven-baked ones were really quite tasty and rather nice with low-fat sour cream, and even nicer with sweet-sour chutney and garlic-tomato ketchup.

Recipe for:
Alu tikkis (potato patties)


Ingredients:

2 large baking potatoes, boiled, peeled and mashed (Doesnt have to be very smooth but dont leave in large lumps!)
1/2 cup green peas, cooked and mashed slightly
1-1/2 cups breadcrumbs (I used a mix of white and wholemeal)
4-5 green chillies, minced
1/2 tsp red chilli powder
1/2 tsp garam masala powder
1/2 tsp coriander powder
1/2 tsp cumin powder
Salt to taste
1/4 cup fresh coriander leaves, chopped
1 cup breadcrumbs mixed with 3 tsp sesame seeds
Oil to shallow fry (if shallow frying)

Method:

1. Mix together all the ingredients (except the 1 cup breadcrumbs mixed with sesame seeds) together to make a firm dough.

2. Shape into round patties about half an inch thick.

3. Press both sides of each patty into the breadcrumb-sesame seed mix to coat.


4. Arrange the patties on a non-stick baking sheet and bake in the oven till golden brown, turning them over once during the cooking time. Mine took about 15 minutes, I think - cant be more certain because unfortunately I neglected to time it.

Baked alu tikkis

If shallow-frying, fry in batches on a flat frying pan or tava, until golden brown. Keep the cooked patties warm in the oven.


Shallow-fried tikkis

5. Serve hot, with sour cream, tomato ketchup or any savoury chutney on the side.

Tuesday, January 10, 2006

Carrot and coriander soup

Just saw the entry over at Nupur's One Hot stove for ARF/5-a-day Tuesday#2 hosted by Sweetnicks and decided to make my entry as well. I dont usually have the opportunity (or the imagination) to take part in the various competitions that come along, but this one seemed rather easy. PLUS, I was going to make carrot and coriander soup anyway! :)

Why carrot and coriander soup? Because I had 250gm of Chantenay carrots that needed using up, ditto a bunch of wilting coriander. Yep, that's the other reason - because the ingredients were going waste. I guess it's as good a reason as any to cook up something.

I've not made carrot & coriander soup before, although I've had it once or twice. I'm not crazy about carrots unless they are raw - either eaten as is, or in a salad - and I absolutely dont like them boiled or roasted. So the first time I had carrot-coriander soup, it was quite a revelation... not too "boiled carroty", beautifully savoury, with a touch of sweetness that probably came from the carrots. Maybe it was just the recipe used by that particular chef, I dunno. Still, I decided to give it a go and make it myself - and the end result, although it didnt taste like that unknown chef's, was pretty good. The soup, with a loaf of store-bought crusty French boule, made a very nice light supper.

Recipe for:
Carrot and coriander soup


Ingredients:

4 medium carrots, peeled and chopped into chunks
1 bay leaf
1 medium onion, chopped
2 tbsp chopped shallots (optional)
2 cloves garlic, chopped
1 bunch coriander, cleaned and chopped (about a cupful). Reserve a tbsp of the stems.
1 tsp black peppercorns
1 tbsp butter + 1 tsp oil
Salt to taste
4 cups water, or as required
1/4 cup milk
1/2 tsp cinnamon powder, for garnish
A few coriander leaves, for garnish

Method:

1. Heat the butter in a saucepan and add the bay leaf and peppercorns for 30 seconds.

2. Add the onions and garlic and fry till the onions turn translucent. Then add the carrots, coriander stems and water.

3. Cook the carrots until soft, then remove, cool and puree in a blender along with the coriander leaves.

4. You should have about 2 cups of stock now. Strain the stock to remove the peppercorns and bay leaf.

5. Add the stock and the milk to the puree, until the soup is the consistency you want. Bring to a boil again.

6. Season with salt and freshly ground pepper. Sprinkle the cinnamon powder decoratively over the top of the soup and garnish with coriander leaves.

7. Serve hot with fresh crusty bread.

Monday, January 09, 2006

Chow-chow (chayote) dal


This preparation falls somewhere between kootu and dal - it isnt a kootu because it doesnt have ground coconut masala to flavour it and it isnt quite a dal because I added sambar powder as flavouring. Whatever, it tastes just great with chapatis and is just as nice with rice. I guess there are plenty of cooks out there who have various ingenious ways too make this vegetable, but for someone like me, who has only tried it the "kootu" way, this recipe was quite radical. Especially as it was more or less off-the-cuff!

Recipe for:
Chow-chow (chayote) dal


Ingredients:

2 cups chayote squash/chowchow, peeled and cut into small cubes
1/2 cup tuvar dal
1/4 cup chana dal
2 small onions, chopped fine
2 tomatoes, chopped fine
3 green chillies, made into a paste or minced
2 dry red chillies
1 tsp cumin seeds
4-5 curry leaves
1 tsp coriander powder
1 tsp mustard seeds
2 tsp oil
1 tbsp sambar powder
Salt to taste

Method:

1. Pressure cook the chow-chow with the two dals. (If you dont have a pressure cooker, cook the tuvar dal separately to a mush, and cook the chana dal & chowchow together till done. The chana dal shouldnt be very mushy.)

2. In a pan, heat the oil. Add the mustard seeds, cover and let them pop. Then put in the cumin seeds, green chilli paste, red chillies and curry leaves and fry for about 30 seconds.

3. Add the onions now, stir well and cook till they turn soft. Then add the tomatoes and 1/2 cup water and cover, cooking till the sauce is thick and the tomatoes mushy.

4. Now stir in the coriander powder and sambar powder and then add the cooked vegetable and dals. Add salt to taste.

5. Bring to a boil, then turn the heat down to a simmer and let it cook for 5 minutes. Garnish with chopped coriander leaves and serve hot with chapaties or over steamed rice.

Sunday, January 08, 2006

Oven-baked cassava

Cassava is a vegetable I remember from the years we were in Dar-es-Salaam, Tanzania - it was available as street food everywhere, roasted over coals or deep-fried. Personally the roasted cassava was my favourite... for about a shilling, you could get a large paper cone of roasted pieces, sprinkled with salt and red chilli powder. I can tell you it tasted divine, probably because of its very simplicity. The flavour and texture of cassava (or "mohogo", as it's known in Swahili) falls somewhere between potatoes and parsnips - firmer than potatoes when cooked, but not as sweet as parsnips.


Cassava was not something we ever cooked at home, so when I bought a fat, foot-long length of the tuber on impulse recently, I was at a slight loss about what to do with it. However, I decided to try baking it in the oven, treating it pretty much as I would a potato. Well, not exactly the same, obviously, as the cassava skin had to be peeled.

To my surprise it was easy enough to peel, but cutting it into chunks was a different matter. The tuber is VERY hard (if you find it at all spongy or soft, throw it away!) and I came close to disaster a couple of times when my knife slipped. (Ma, if you're reading this, dont worry, my fingers are safe and I still have all 10.) I also made sure to take out the stringy bit from the middle.

Anyway, once the cassava was cut into chunks, I put them in a saucepan with plenty of water and let it boil until the pieces were parboiled. Then they went into the oven (ofc with seasoning!) and about 20 minutes later, they were done. Yummy, they were almost as good as those I'd eaten in Dar. I say almost, because memories of good things (and good times) are sometimes stronger than reality.

One warning, though... you have to keep a sort of hawk eye on the cassava after 10 minutes in the oven - checking every so often to see that it's reasonably soft-crisp but not overdone. I baked some of the chips for too long and they not only looked and felt like chips of wood, they also tasted about the same. A trial for the teeth, certainly.

Recipe for:
Oven-baked cassava


Ingredients:

4 cups cassava - peeled, cut into chunks and parboiled
3-4 tbsp oil (I used Lite Sunflower Oil spray)
Salt, pepper/red chili powder to taste

Method:

1. Toss the parboiled chunks of cassava with the oil and spread on a baking tray.


2. Bake in the oven at 180C for about 20 minutes (or till pale golden brown), turning over the chunks after 10 minutes for even baking. Check the cassava often to ensure it doesnt get dried out.


3. Serve hot, sprinkled with salt, red chili powder and any herbs/spices of preference.

Saturday, January 07, 2006

Sevai - rice noodles, South Indian style

Like I've said before, there's nothing like fresh-made sevai. And while the recipe to make the sevai dough is as simple as they come, the actual making process can be somewhat time- and energy-consuming. And yet it's worth the trouble, once in a rare while, to go the whole nine yards and make sevai from scratch.

Once it is made, the basic sevai can be made into several tasy dishes with various flavourings and additions - both sweet and savoury. As always, I prefer the savoury versions because my sweet tooth, never particularly pronounced, is getting shyer and more retiring by the day. Sevai can be made into lemon sevai, coconut sevai, masala sevai with vegetables, etc - but the classic combination is mor kuzhambu and poppadams, deep-fried. Dont ask me why mor kuzhambu and not any sambar - some things are just the way I've always known them!

By the way, sevai is traditionally made with parboiled rice (puzhungal arisi). I dont know if it would work with basmati rice or any other type of rice... one of these days I might give it a go, but if anybody out there has already tried making sevai with basmati or other rice varieties, please let me know how the sevai turned out!

If you dont have a sevai press, I believe you can use a
ribbon pakoda achu to the same effect - of course using the omapodi-making plate - the one with tiny holes. It would probably be even more time-consuming this way, though, as only a little dough can be used at a time to make the noodles.

Recipe for:
Sevai

Ingredients:

2 cups parboiled rice (puzhungal arisi)
2 tbsp oil
Salt to taste
Water to soak the rice

Method:

1. Soak the rice in water for 8 hours or overnight.

2. Grind to a very smooth, thick batter (like idli batter) using only as much water as necessary. Stir in the salt and oil once the batter is ready.

3. Grease some
idli plates and pour the batter in each depression. Steam in a pressure cooker, without using the weight, for 10 minutes.

4. Turn the heat down to a simmer and carefully remove one idli plate from the stand. Close the cooker again. It is important that the noodle dough stays hot until just prior to being used. Cold dough is very, very difficult to work with.

5. Scrape the "idli" into the hollow cylinder of the sevai press.


6. Bring the top cylinder down over it and turn the handle (much easier to do if another person holds the legs of the press steady).


The pressure forces the noodles out of the tiny holes in the hollow cylinder. Use up the remaining dough in the same manner.


7. There it is - sevai ready for transformation into various flavoured avatars!


Note: The sevai needs to be "loosened" when cool - this can be done gently with two forks. If the sevai seems rather sticky, dampen your hands as necessary with water, and gently separate the noodles with your fingers.

Friday, January 06, 2006

Indian kitchen - Sevai press

"Sevai" is rice noodles, South-Indian style. The recipe is simple but the making process fairly laborious. Yet the hard work is worth it, because the end result beats anything made with "instant" noodles, believe me. There's nothing like fresh sevai made into different tasty varieties, or just eaten plain with mor kuzhambu (savoury sauce made with buttermilk as the base) and fried (well, nowadays microwaved) vadams/poppadums. And sevai is made using this press that looks like it belongs with Madame Tussaud's collection of torture implements!


Recipe for sevai in my next post!

Thursday, January 05, 2006

Hello, 2006

It's already a week since I returned from India, and I havent had the time till now to post anything. I guess the fact that I had to go to work the very next day after returning, jet-lag and all, is adequate description of how the time flew by!

The trip home was everything I wanted and still not enough... 2 weeks was too short a time for all that I wanted to fit in. Not that two months - or even two years - would have been enough... I guess that is the price one has to pay for making a life and a home away from Home.


The three Fs are what I miss most when I'm away from India - Family, Friends and Food. One cant re-create one's family or friends away from home - but food is most definitely there to be duplicated and replicated. Granted, I always feel that what I cook here on my own isnt a patch on my mother's cooking, or that of various relatives or even, in a pinch, that available at the restaurants back home. But there is some kind of satisfaction to be gained from trying. And definitely a lot of inspiration and enjoyment from reading about the trials and triumphs of other food bloggers.

Here's hoping that 2006 brings more triumphs than trials to everybody!