Friday, May 27, 2005

Banana bread

I dont know why banana bread is usually baked like actual bread, in a loaf shape. I've tried it baking it in a round tin and in a square tin and really they taste exactly the same, except that you get wedge-shaped slices from a round cake, square or rectangular slices from a square cake - and slices from a loaf, obviously. I dont know why it isnt called banana cake - but it isnt, for some obscure reason.

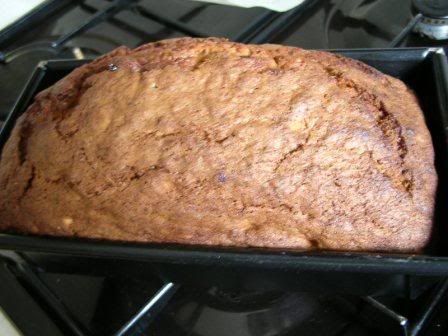
Anyway, this time I opted to bake it in a loaf tin, as tradition seems to call for. Of course, I added cardamom powder again - I cant resist it. It smells so heavenly along with the banana smell as the cake cooks in the oven. And man, were my bananas ripe! They were so ripe that I think it was only the skins holding the pulp in. Yucky to eat and rather gross to look at, but in a cake or a smoothie, overripe bananas are so aromatic and add so much sweetness. I hardly even had to mash them :)

Recipe for Easy Banana Bread

Image hosted by Photobucket.com

Ingredients:

3 overripe bananas, mashed
2 cups plain or cake flour
1-1/2 cups caster or granulated sugar (I used 1 cup light sugar and 1/2 cup Splenda)
1 tsp baking powder
1/2 tsp bicarbonate of soda
1/4 tsp salt
1/2 cup butter or margarine, softened but not melted
2 eggs
1 tsp powdered cardamom seeds
1/2 cup pecans/walnuts/macadamias/brazils, roughly chopped (any or all of these is ok to use)

Method:

1. Cream the butter and sugar together until fluffy.

2. Add the eggs one at a time, beating well after each addition

3. Add the mashed bananas and mix well.

4. Sift the flour, baking powder, baking soda and salt together.

5. Add the flour, nuts and cardamom powder to the banana mix, stirring only to mix. DO NOT BEAT.

6. Bake in a well-greased loaf tin for about an hour, or till done, in a 180 C oven (350 F).

7. Let the bread remain in the tin for a couple of minutes, then turn out onto a wire rack and cool. It can be eaten warm (rather nice that way).

Wednesday, May 18, 2005

Nut-and-sultana orange cake

Another orange cake recipe, because I've got so many at home. Oranges, I mean. I think there must be at least a dozen-plus oranges left even after I ate two, and Rebecca a few more (good thing she was here yesterday)... that's what comes of taking up the "Buy one dozen, get the next dozen free" offer at the supermarket. Pete doesnt stop to think if we can use whatever's going cheap - he's just so entranced by the bargain that he just grabs them (which is why I prefer to do the shopping!). Then they sit around at home, quietly going rotten while I frantically try to use them up somehow, ANYhow.

Which brings me to the cake. It's a much more moist affair than the orange-chocolate marble cake, with lots of golden sultanas and nuts. The best thing about it is that there's no complicated beating and adding and care involved in making the batter. Just assemble the ingredients and mix 'em up. My kind of cake!

Image hosted by Photobucket.com

I usually dont chop up the sultanas for any cake, but this time I did - sat in front of the TV watching sitcoms while I snipped the sultanas up with my spare embroidery scissors (my kitchen scissors unaccountably having disappeared). I also used three kinds of nuts in the cake - brazils, pecans and macadamias.The traditional way is to use vanilla extract as flavouring, but I decided to substitute that with about a teaspoon of powdered cardamom seeds.

The cake smelt gorgeous - there's nothing as wonderful as the sweet aroma of cardamom - and the cardamom brought to mind (and tongue) the memory of the rava kesari that I love... very nice indeed!The icing with fresh orange juice (what else!) and grated orange peel just topped the cake off nicely, adding the extra sweetness that Pete requires.

Recipe for:
Nut-and-sultana orange cake flavoured with cardamom


Image hosted by Photobucket.com

Ingredients:

2-1/2 cups all-purpose or cake flour
2 tsp baking powder
1/4 tsp baking soda
1/2 tsp salt
1-1/2 cups sugar (I used 1 cup light sugar, 1/2 cup Splenda granular
1 tbsp orange zest
1 cup golden sultanas, snipped to pieces (can be left whole too
1/2 cup mixed nuts (I used pecan, macadamia and brazil), chopped
1-1/2 cups buttermilk
2/3 cup margarine or butter
3 eggs
1/2 tsp cardamom seeds, powdered fine
OR
2 tsp vanilla extract

For the icing

1/3 cup margarine or butter, softened but not melted
2-3 cups icing sugar
1 tbsp orange zest
Fresh orange juice (about 1/2 a medium orange squeezed, more if required

Method

1. Sift the flour with the baking powder, soda and salt in a big mixing bowl

2. Add the rest of the ingredients to the flour, making sure that the batter is well mixed

3. Put the batter in a greased 9" cake tin (round or square) lined with silicone paper. Bake in a moderate oven (180 degrees C or 350 Fahrenheit) for 45-50 minutes, or till done. Poke a cake tester in the middle to see if it's done.

4. Let the cake sit for 5 minutes in the tin, then unmould and cool completely on a wire rack.

Icing: Put the icing ingredients in a bowl and mix well, adding as much orange juice as required to make the icing spreadable. Ice the top and sides of the cake.

Tuesday, May 17, 2005

Tandoori paneer & green peas pulau

The first time I introduced paneer to Pete, I didnt tell him what he was eating. I just served it up for our dinner and waited for his reaction which, after a few thoughtful bites, was a puzzled: "This is yummy. Is it chicken? How did you mask the chickeny taste? Hey, are YOU eating chicken!?!" Nope I wasnt, I told him gleefully. He was eating - ta-DAH! - Indian cheese. Paneer, to be precise. Since then, I've made various paneer dishes and he's loved all of them.

And tonight, he asked if I could make something with paneer for dinner. That coincided rather nicely with my decision to use up the ready-bought 250gm-pack of paneer that was a bit past its best-by date. So tandoori paneer found itself on the menu, along with green peas pulau. And it was a very creditable success. The tandoori paneer turned out gorgeously crisp on the outside, its ginger-garlic marinade cut deliciously by the fresh lemon juice, and succulently soft on the inside.


Image hosted by Photobucket.com

I dont know if this recipe would work as well on home-made paneer, because you really cant get it as firm as the store-bought stuff. But there are plenty of other recipes perfect for the softer texture of home-made paneer... I guess we'll be seeing some of those in future posts.

Recipe for Tandoori Paneer and Green Peas Pulau (to serve 2 persons):


Tandoori Paneer

Ingredients:

250gm firm paneer, cut into one-inch cubes
1 red bell pepper, deseeded, cut in thin rings
1 medium onion, cut in thin rings
1 tsp cooking oil
1/2 tsp salt or to taste


For the marinade:
2" piece fresh ginger
2-3 cloves of garlic
1-2 fresh green chillies, or to taste
2 tbsp fresh lemon or lime juice
1 tsp cumin seeds
1/2 tsp salt or to taste
Couple of drops of red or orange food colouring - optional. (I used 2 tsp of paprika to add a bit of colour.)
Pinch of ready-bought tandoori or chaat masala, for garnish - optional

Method:

1. Grind all the items for the marinade in a spice or coffee grinder to a paste.

2. Put the paneer pieces in a shallow dish and pour the marinade over, reserving a tsp of it. Turn the paneer pieces gently with your fingers until the pieces are more or less coated with the marinade.

3. Set aside for about an hour, minimum.


Image hosted by Photobucket.com

4. About 10 minutes before you want to serve the paneer, heat up the grill in your oven. Arrange the marinated paneer pieces on a greased tray or rack and grill, turning once or twice, until the paneer begins to turn golden on the surface.

5. While the paneer is grilling, heat 1 tsp oil in a wide frying pan and add the reserved teaspoon of marinade. Fry this for a few seconds, then put in the onion rings.

6. After about 4 minutes, add the bell pepper rings to the onion and cook the mixture for 3-4 minutes longer, or until the onion is translucent and the bell pepper is slightly wilted.

7. Toss the tandoori paneer with the bell pepper and onion mixture, and serve hot.

Green peas pulau

Ingredients

1 cup basmati rice, cooked al dente
1 cup green peas, cooked (fresh is best, frozen is ok too)
2 onions, sliced thin
1 tsp ginger-garlic paste
1 tsp whole cumin seeds
2 fresh green chillies, slit (fewer or more according to taste)
1-2 tbsp cooking oil
1 tsp garam masala (if available)
OR
mix of 1/2 tsp cinnamon powder, 1/2 tsp powdered black pepper, 1/2 tsp powdered coriander seeds
1 tbsp freshly chopped coriander leaves, for garnish - optional

Method:

1. Heat the oil in a big wok, add the whole cumin seeds, fresh green chillies and ginger-garlic paste. Fry this for about 30 seconds, stirring constantly.

2. Now add the sliced onions and the garam masala or spice mix. Cook the onions until they turn soft and begin to brown a little, then add the cooked green peas and rice.

3. Turn this mixture over carefully to distribute everything evenly. Take care not to break up the rice grains.

This can be made ahead and reheated in a microwave oven. Just before serving, garnish with freshly chopped coriander leaves.

Chocolate-orange marble sponge cake

Image hosted by Photobucket.com
Chocolate-orange marble sponge cake. It turned out pretty good - soft and spongy without the kind of choking dryness that defies all attempts at swallowing. It would have been nicer still had I not forgotten about it in the oven (I did say I'm an amateur cook, prone to distractions!)... the extra 10 minutes that it spent in the oven made the top of the cake a bit crispy. It also developed cracks *sigh*. Not unpleasant, really, but also not required. The cake was just sweet enough for me, but my husband doesnt just have a sweet tooth - he has a mouthful of them! So I drizzled some pure Canadian maple syrup (difficult to get in the UK, I kid you not) over the top of the cake. A satisfactory ending for all.

Chocolate-orange marble sponge cake:

Ingredients:

2 cups all-purpose or cake flour
2-1/2 tsp baking powder
1/2 tspsalt
2/3 cup butter or margarine
1-1/2 cups sugar (I used 3/4 cup 'light' sugar and 1/2 cup Splenda granular to make 1-1/4 cups, but I like my cake with less sugar)
3 large eggs
1 tsp extract of vanilla
3/4 cup milk (I used whole milk)
1/4 cup unsweetened cocoa powder, sifted
2 tbsp orange-flavoured liqueur or concentrated orange juice, or failing that, freshly squeezed juice from 1/2 a medium-sized orange
1 tbsp grated orange rind

Method:

1. Sift flour, baking powder and salt in a bowl and set aside.

2. Cream the butter or margarine in another bowl, add sugar/Splenda mix gradually and keep creaming till the mixture is soft and fluffy. Note that the addition of Splenda granular means that the mixture may well become a bit stiff.

3. Add the eggs one at a time, and beat thoroughly after each addition. Then add the vanilla.

4. Now add the flour mix and the milk alternately, starting and ending with the flour, and only stirring to mix. DO NOT BEAT.

5. Divide this batter in half. Add the unsweetened cocoa powder to one half and stir until blended.

6. To the other half, add the orange rind and liqueur/concentrate/fresh juice, whichever you are using. Stir until blended.

7. Spoon the batter into an 8" round cake pan that has been greased or lined with silicone paper. Alternate the chocolate and orange batter in the pan. There will be more batter than can be accommodated in one layer, so continue spooning the batter alternately over the first layer, making sure that the orange batter goes over the chocolate batter in the pan.

8. Bake for 45 minutes in a 1800C oven (350 Fahrenheit), or until done. Test with a skewer.

9. Let the cake stand in the pan for a couple of minutes, then turn out onto a wire rack and let cool. Sprinkle the top lightly with confectioners sugar when the cake has cooled completely.

10. Serve with a drizzle of maple syrup for those who like their cake sweet, or with orange-flavoured cream.

This time it's a food blog!

So here I am, with my own food blog. I wonder if I've bitten off more than I can chew (to coin a phrase - not!). Well, only time will tell. I've dabbled with the odd recipe or two when I was younger and living in India, but never really picked up any interest in cooking - I mean, why bother? My mom, aunts and friends' moms were always there to provide great food. And if that wasnt enough, there were all those dozens of eateries in Chennai, ranging from roadside stalls with mouth-watering food, to the swanky "foreign" ones offering everything from pizza and pasta to enchiladas and sushi.

That comfortable situation changed a bit when I left India for Singapore, but things were not too bad because I could still access authentic Indian food while having my pick of South-East Asian and European food... even though said pick was restricted rather more because I'm a vegetarian. The drastic change in circumstances came about when I moved to England - all I could get was "balti" or "tandoori"... and not particularly authentic either.

Food from other parts of India is mostly unknown in all but the biggest city - that would be London. And I dont live in London. After a few months of serious craving for genuine samosas, idlis, dosas, kootu, sambar ANYTHING South Indian, I decided that the only way to go was to learn how to cook all those things. That, to put it in a nutshell, is how I began to develop a serious interest in cooking. And now I have my own food blog - advanced indeed!

I dont mind cooking non-vegetarian dishes for my husband, but it's always a case of "will-it-be-edible-or-wont-it" because I dont taste anything during the cooking process or even after. My husband is the guinea pig - and so far I havent killed him, so I must be doing something right! I'm always on the lookout for vegetarian food, preferably healthy (even though my cravings are for the non-healthy but oh-so-tasty fried snacks and foods)... I love fusion cooking and trying out new recipes. Or at least tweaking someone else's recipes to suit my tastes... and that is what these recipes here are going to be. Tweaked recipes, Shammi style.